
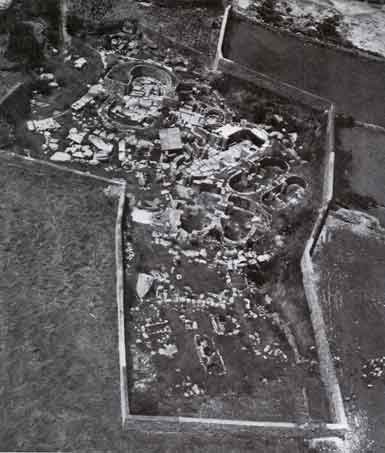
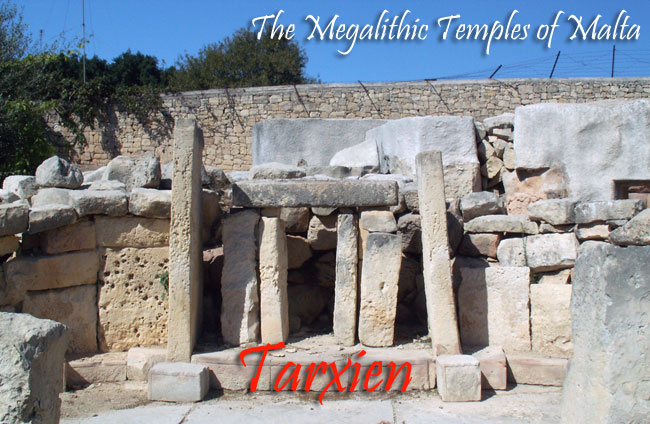
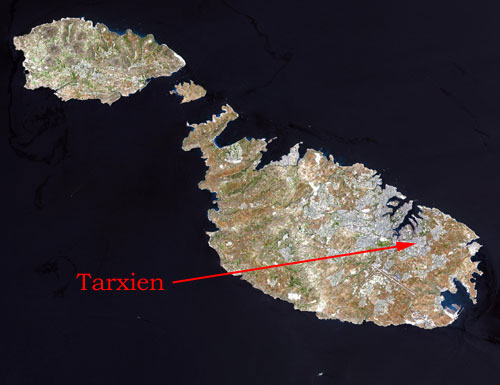
Tarxien is the most complex of all of the Maltese temples but, unfortunately, it is also one of the more badly disturbed. Today it is surrounded by the suburbs of Valletta but at the time of its discovery in the early years of the twentieth century, the site was agricultural land and its existence became known when local farmers reported ploughing up worked stone. By that time the land had been under cultivation for thousands of years, however, and most of the superstructure had long since been disappeared. Much of what is seen today has been reconstructed on top of the original foundations.

Excavations were conducted by Themistocles Zammit beginning in 1915 and continuing, off and on, over the course of the next four years. In the course of them he uncovered the remains of four temples—Tarxien South, Tarxien Central, Tarxien East and Tarxien Far East—along with a 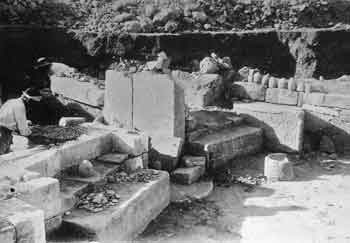 number of smaller structures.
The first thing he noted was an Early Bronze Age cemetery that cut into the upper fill of much of the South Temple and part of the Central Temple. The area was pockmarked with burial pits and hollows containing cremated burials accompanied by bronze blades and fine pottery. It is thought that the scorch marks found on many of the surviving megaliths came from their funeral pyres.
Although there are traces of an earlier occupation belonging to the Zebbug phase, the temples were in use from about 3500-2500 BC. The Far East Temple was the first to be built, in the Ggantija phase, while the South and East Temples were added in the Tarxien. The main axis of both runs NNE-SSW. Finally, the Central Temple, running on an entirely different axis (ENE-WSW) was inserted between the latter two later in the Tarxien phase.
Since 1919, the site has been re-examined a number of times—by Thomas Ashby in 1929, John D. Evans in 1954 and David H. Trump in 1958—in order to clarify the stratigraphy and chronology.
Tarxien South
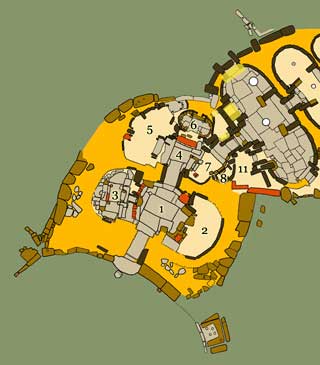
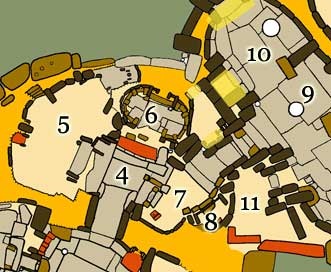
Tarxien South was built as a rather typical four-apse temple, a symmetrical arrangement of rooms along a single axis running from the entrance to the main altar which sat in a niche at the rear of the building. However, in the course of its lifetime there was a major remodelling in order to accommodate Tarxien Central. The innermost apse on the right hand side [7] was converted into a small lobby connecting the two buildings.
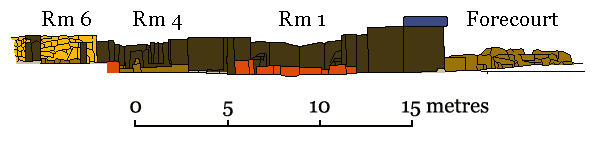
Section through Tarxien South running along the main axis from the rear altar in Room 6 to the forecourt
From the main entrance, the passageway runs straight through to the back of the temple, where the main altar stands in a deep niche, Room 6, which was clearly separated from the rest of the building by a low block of stone decorated with patterns of running spirals. Along the way it passes two pairs of apses, an outer pair on either side of Room 1 and an inner pair flanking Room 4. Room 1 may well have been an open court (at least, there is no sign of any roofing material).
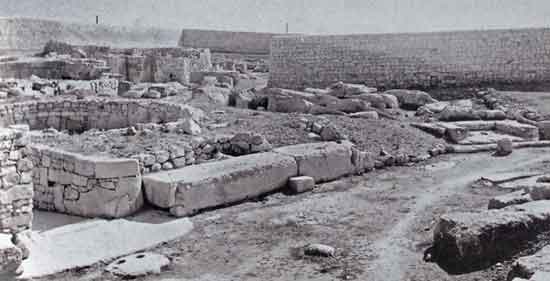
Tarxien South. The entrance with its large threshold slab and tethering block is on the left, in front of the threshold, and the ‘divining block’ is at the right-hand end of the façade.
The entrance was at the middle of a curved façade that looked onto a spacious torba forecourt that extended at least 30 metres to the southwest. Unfortunately, the original stones of the façade 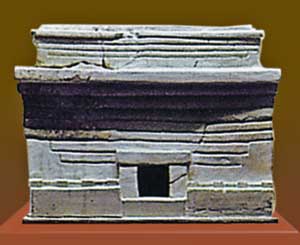 had been almost entirely removed long before excavations took place, and what is visible today is almost entirely reconstruction. However, fragments of a model of just such a structure (left) were found in Room 6 that give some idea of its original appearance. Note especially the way the upright at either end have been cut away to accommodate the lowest horizontal courses. Note also that, if the scale is accurate, the façade would have been much higher than any surviving temple
A large semi-circular threshold, a single slab measuring 4.3 x 2.5 metres, projected well out into the forecourt. At the back end was a raised sill about 5 cm. high and 45 cm. broad that marks the beginning of the entrance passage. Right in front of the threshold was a flat, roundish stone, about 1 metre across with a sizeable V-perforation, that was presumably used as a tethering block for animals destined for sacrifice as part of the ritual. Processions of animals certainly figure prominently in the artwork of the temple.
The ‘Divining Blocks’
At the eastern end of the façade (below right) was what Evans calls a ‘divining block,’ a slab of stone about 3 metres square, screened on three sides by uprights (now reduced to stumps). In front of it was a low sill continuing the curve of the façade. The centre section of the block was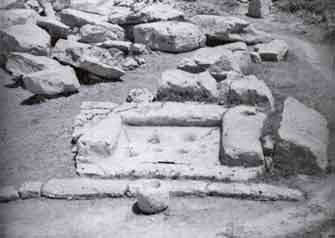 carved so as to leave a ledge ca. 30 cm. high and up to 1 metre wide. In the southeast corner is a conical hole 40 cm. across and 35 cm. deep. The base of the slab was perforated by five additional holes, also conical.
In front of the installation was a cylinder of stone 45 cm. long and 50 cm. across that had an hour-glass perforation. A few metres away was a heap of over a hundred balls of various sizes. The obvious conclusion is that there was some sort of connection between these objects and that the connection had something to do with ritual activity—although whether or not this had anything to do with forecasting the future is anyone’s guess. The poorly preserved remains of a similar installation was found at the western end of the arc. The block was badly broken and unperforated but a nearby fragment, possibly part of it, had at least one hole and a number of stone balls were found nearby.
Court 1
From the doorway a short entrance passage 2 metres across and about 3.6 metres long. It was paved with a single massive slab 80 cm. thick. The corridor leads to a roughly rectangular, paved space [1] 7.4 metres long and 6.1 metres wide. In all likelihood the area was left open. Roofing it in addition to the chambers on either side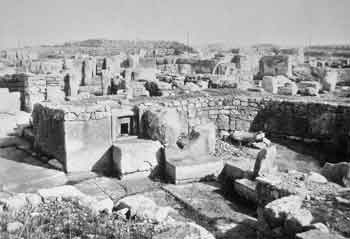 would have been an enormous technical problem and the surface was definitely well-designed for the elements. It was made up of a few large, carefully fitted slabs of stone up to a metre thick—the largest was nearly 4.5 metres long and abut 2.6 metres across. Roughly in the centre of the latter was evidence of damage from repeated and prolonged burning, presumably from the cremation fires of the Bronze Age users of the site.
Across the courtyard, on either side of the doorway leading to the rear of the building was an altar. The one on the right (Altar Beta) was a rather impressive structure, consisting of a hollow block of stone with a small window-like niche above. The front of the altar block is carved with two rows of running spirals with small buds or thorns projecting from them, giving them a vegetal appearance. The motif is found throughout the temple, marking the important divisions—the interiors of the apses or the main 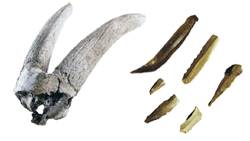 altar at the far end of the main passage.
One of the spirals on the front had been hollowed out to form a fair-sized cavity. A plug was carved to match the rest of the design and fitted to close the opening. When Zammit removed it he found a number of objects (right), including bones of sheep and cattle as well as a few marine shells. There was a bone spatula along with thirteen flint knives and some potsherds. Of special note was a finely crafted flint knife, the last item to be placed inside before the altar was closed.
Altar Gamma, on the left-hand side of the inner passage, was apparently less elaborate than its companion but only the block at the bottom has survived (see the photo of Apse 3, below). It is partially concealed by the right-hand end block of the façade of Apse 3 but the rest of the surface is decorated with the usual pattern of running spirals. Just in front of it and slightly to one side, was a cylindrical object (ca. 35 cm. high and 50 cm. across) with a slightly hollowed upper surface and decorated with a pattern of drilled holes.
Apse 2
The outer pair of apses contained most of the artwork in the temple, in the form of sculpture and carved reliefs. Each was marked off by a line of decorated stone blocks and similar examples can be 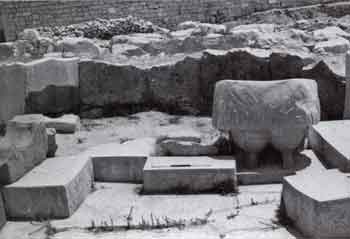 found within them.
Apse 2 was separated from the inner court by a line of blocks carved with the familiar pattern of running spirals. However, there was no gap to serve as an entrance so presumably one stepped over them to gain access to the interior.
Unlike many rooms at Tarxien, some of the superstructure of the inner wall of the apse has survived. As can be seen in the photo (left), they were constructed of closely fitted vertical slabs ranging in width from 1.3 to 1.8 metres. The tallest of them only survive to a height of about 1.5 metres—everything above that has disappeared. The floor was torba so the room most likely had a roof, although all trace has disappeared.
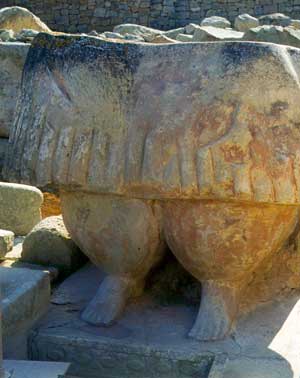
On the right as you look into the apse is a larger-than-life statue found by Zammit in 1915. Unfortunately, it had been very badly damaged over the years. The upper half is entirely missing but it may have once stood about 2.5 metres tall 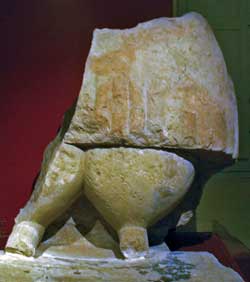 (assuming that it was standing and not seated). Subsequent ploughing and quarrying activities are possible agents of destruction but it may well have been smashed during the Bronze Age by the people who cremated and buried their dead over the ruins of the temple. It was as if they wanted to destroy the power of the old gods and reconsecrate the site with the remains of their ancestors. The statue showed signs of having been scorched, presumably by funeral pyres in the area of Court 1.
The statue was carved in what could be termed the local style as evidenced by a number of much smaller figures found at the site or nearby—the distinctive swollen calves and pleated skirt. The front of the statue’s base with carved with a frieze of what appear to be eggs, a fairly obvious fertility symbol. However, the gender of this figure, as is the case with many others on the island, even one’s that do survive intact, is not immediately apparent.
At the far end of apse, sitting with its back against the altar in Court 1 (see photo above), is a small alcove defined by two large upright slabs and the inner wall. Its function is unknown.
Apse 3
The walls of the other apse had almost entirely disappeared by the time Zammit began his excavations and were subsequently restored with dry stone walling. The floor was paved with slabs so the line of the wall was not difficult to trace.
South Temple. Apse 3 with Altar Gamma on the right. The two tall slabs on the right, behind the façade do not belong there but were set there by the excavator. They were originally part of a niche.
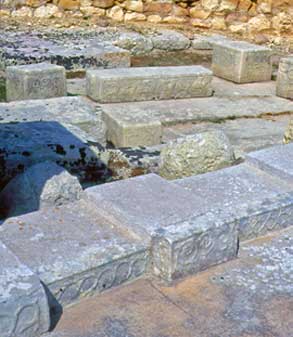
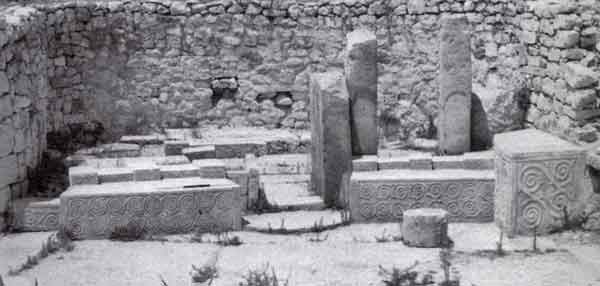
 Apse 3 was also screened off by a line of stone blocks decorated by running spiral motifs—in this case, a pair of low blocks, each about 50 cm. high, 90 cm. wide and 2 metres long. They angle slightly outwards, apparently imitating the curved façade of the temple. On top of these blocks a distinctive arrangement of smaller ones (right). Although nothing similar has been recovered at any of the surviving temple entrances something very similar is shown on the Tarxien model.
There is also what seems to b a scaled down version of the monumental entrance and a semi-circular threshold slab. On either side of an 80 cm. gap was a pair of uprights (only one set survives), each standing about 1.5 metres high but of different thickness. The thinner, innermost slab was perforated with a pair of what Evans describes as ‘rope-holes’ set one above the other, perhaps the fastenings for a screen or door. The upper surfaces of the stones show signs of burning.
Relief Carving of Ovicaprids and a Pig
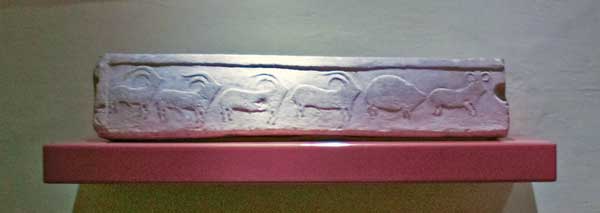
The interior of the apse has an elaborate arrangement of stone blocks carved with reliefs, whose designs included running spiral motifs that were obviously based on somewhat thorny plant tendrils and processions of animals, presumably destined for the sacrificial altar. Opposite the entrance, against the rear wall, were the traces of what appears to have been a very important altar. The broken threshold is carved with a procession of animals—a ram leading a pig and four sheep or goats (they could be either). Nearby is another slab depicting a double line of 22 of them.
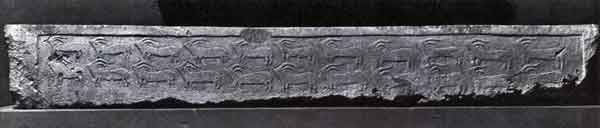
Relief Carvings of Goats or Sheep.
At the left-hand end of the threshold was a cubical block carved on three sides with what look like stylized trees but there is plenty of room for debate on this point. Not much has survived of the altar, 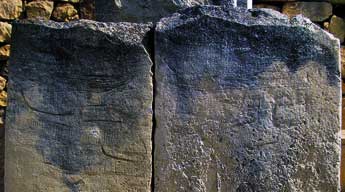 apart from a couple of horizontal slabs set slightly higher than the adjacent floor and some carved blocks, but there is also a carved hollow that may be the setting for another large statue.
A paved walkway is marked by upright slabs bearing graffiti that appears to represent ships (right), probably dating to the Neolithic (although their scorched tops suggests they were still visible during the Bronze Age). Further along were low slabs with a variety of different relief patterns carved onto them—including a pair with some very naturalistic animal friezes. The longest shows two lines of goats with very distinctive horns, eleven in each. The other has a line of four similar animals but with a pig and a ram in the lead. Presumably they were all on their way to be sacrificed.
The next pair of apses are far from symmetrical and the right-hand one [7] in particular had been radically modified to turn it into a passage leading directly into Tarxien Central when that temple was squeezed in. The opposite apse [5] contained upright slabs and a couple of niches, one of which contained the bones and horns from cattle and either sheep or goats.
Tarxien South. Apse 6 from Room 4
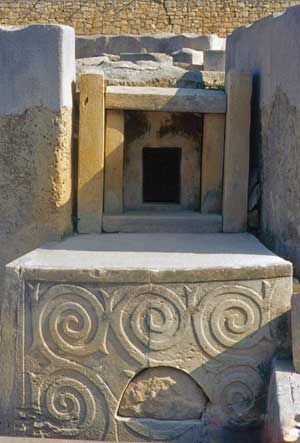
At the very back of the temple was an elaborate niche [6] sitting on top of a platform 60 cm high. The front of the platform was a large slab of stone about 3 metres long, decorated by two rows of running spirals. This was undoubtedly the main altar of the temple.
Tarxien Central
The entrance to the intrusive central temple was through Room 7 of Tarxien South, effectively turning the earlier temple into an elaborate set of antechambers. Since most of the masonry of the latter temple had been removed, it is even possible that the building was totally remodelled at the time. On the right-hand side of the connecting passage was a porthole carved out of a single stone that led to a small intramural space [8], which contained some late Neolithic pottery and animal bones. At the end of the passage Zammit found a pair of bar holes for a screen or door, to preserve the sanctity of the space beyond.
Tarxien Central. View from Apse 9 to the Rear Niche as excavated
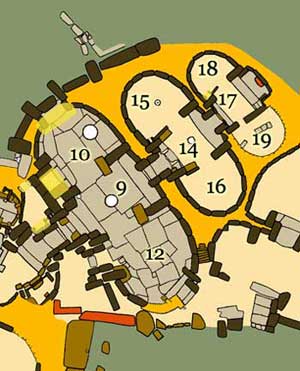
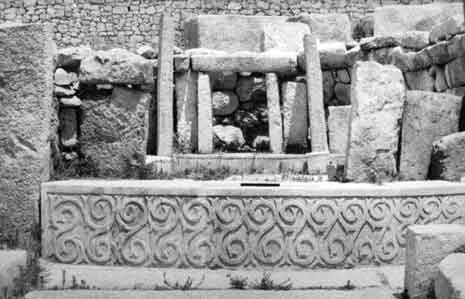
Tarxien Central is a unique example of a six-apse temple, the complex of the type. The additional outer apses were separated from the rest of the temple by a low barrier about 62 cm high, carved with a pair of plain spirals (above). The two more public apses [10 & 12] seem to have served as a sort of lobby and were paved with thick slabs of stone rather than the more usual torba. There was 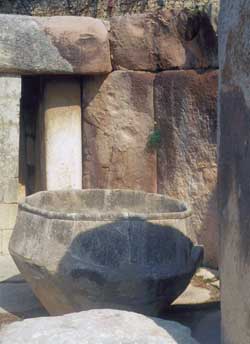 a hearth just in front of a little foyer [9] marking the passage to the rest of the building.The apses are marked off by large upright slabs projecting from the walls on either side of the doorways.
There are a pair of large trilithon structures in Apse 10—one was most likely a niche but the other opened into the small space [11] with a number of small niches containing cattle horns. A complementary space [13] was located on the other side of the entrance, opening off Apse 12. Zammit found the broken remains of a slab built niche with a pair of stone shelves. In front of the niche he found two horn cores, each about 1 metre long. The rear of the chamber was made up of two large stone slabs, one of 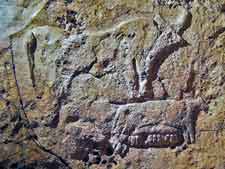 which was pierced by a square hole at ground level. Within the space behind the stone was a deposit of animal bones. Above the opening was the carved relief of a bull, which was, unfortunately, badly damaged by later activity. However, there is a better preserved example (left) along with a carving of a sow nursing a line of piglets on the stone next to it.
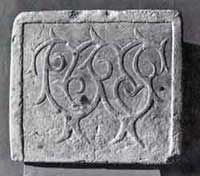
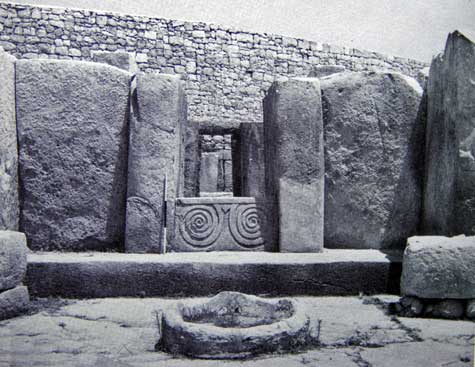
Beyond the carved barrier the passage leads to another pair of apses [15 & 16] separated by a small court [14] with a circular hearth. The walls of the two apses are made of neatly trimmed 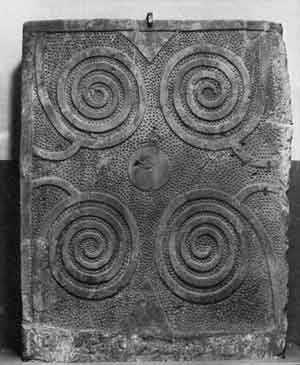 uprights and are separated from the court by a pair of particularly well-carved stone screens. The design is a symmetrical arrangement of four spirals around a central circle, all of it framed within a rectangular border. The open spaces between the raised elements has been filled with hundreds of tiny pits—a masterpiece of prehistoric design (left).
At the end of the passage is a rather large niche flanked by a pair of apses. The left hand niche [18] is substantially intact and has a nicely made niche, with the usual deposit of animal bones. Zammit believed he found evidence to suggest the room was plastered on the interior, possibly even painted, but this is hotly disputed by other scholars as is his suggestion t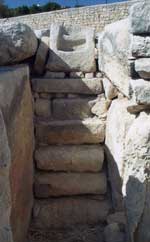 hat it may have had an arched ceiling. The other apse [19] was almost totally obliterated by later activity, both in the Neolithic and afterwards, and what is seen today is a modern reconstruction. Recent research suggests that the room may have been a corridor linking this building to Tarxien East much as Room 7 connects it with Tarxien Central.
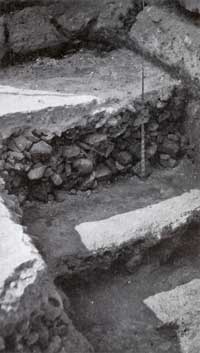
One interesting feature is what looks like a staircase in the angle between Tarxien Central and Tarxien East (right). The first six steps are individual blocks of stone while the last two were carved out of a single block. The steps are rather steep but it seems pretty clear that they were intended to lead to an upper level of Tarxien Central or, more probably, to the roof.
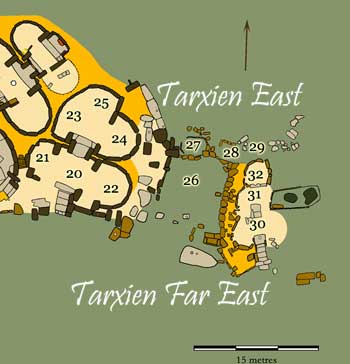
Tarxien East
The eastern temple also shows evidence of having been substantially modified—both by the construction of Tarxien Central as well as by Roman activity on the site. This is most apparent in Apse 23, which looks very deformed. In all likelihood this had to do with the construction of a 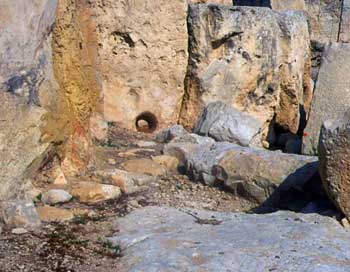 passage between the two buildings as suggested above. Unlike its neighbours, no reliefs nor statuary in Tarxien East. There are a number of ‘oracle-holes,’ however. These are low to the floor (left) and funnel-shaped, like a megaphone. In addition, there are a number of smaller structures attached to the east side of the building, including one with a porthole door that opened onto a small, squarish courtyard [26].
Tarxien Far East
On the other side of the courtyard are the remains of Tarxien Far East, the earliest temple on the site. Only half of the building had survived the millennia but there was enough to show that it had five apses and is typologically similar to others, such as Skorba, that date to the Ggantija Phase. The remaining foundations show that the building was made out of smaller, more manageable blocks of stone instead of the megalithic orthostats of the later temples.
Note. All of the black and white photos on this page are taken from J.D. Evans, The Prehistoric Antiquities of the Maltese Islands: A Survey. The Athlone Press, University of London, 1971
